PyODE Tutorial 2
By Matthias Baas.
This tutorial gives a short example of how to connect bodies with joints. In the end, there'll be also an example of using motors. To run the example program you'll need the pygame package.

Program Listing
# pyODE example 2: Connecting bodies with joints

import pygame
from pygame.locals import *
import ode


def coord(x,y):
    "Convert world coordinates to pixel coordinates."
    return 320+170*x, 400-170*y


# Initialize pygame
pygame.init()

# Open a display
srf = pygame.display.set_mode((640,480))

# Create a world object
world = ode.World()
world.setGravity((0,-9.81,0))

# Create two bodies
body1 = ode.Body(world)
M = ode.Mass()
M.setSphere(2500, 0.05)
body1.setMass(M)
body1.setPosition((1,2,0))

body2 = ode.Body(world)
M = ode.Mass()
M.setSphere(2500, 0.05)
body2.setMass(M)
body2.setPosition((2,2,0))

# Connect body1 with the static environment
j1 = ode.BallJoint(world)
j1.attach(body1, ode.environment)
j1.setAnchor( (0,2,0) )

# Connect body2 with body1
j2 = ode.BallJoint(world)
j2.attach(body1, body2)
j2.setAnchor( (1,2,0) )


# Simulation loop...

fps = 50
dt = 1.0/fps
loopFlag = True
clk = pygame.time.Clock()

while loopFlag:
    events = pygame.event.get()
    for e in events:
        if e.type==QUIT:
            loopFlag=False
        if e.type==KEYDOWN:
            loopFlag=False

    # Clear the screen
    srf.fill((255,255,255))

    # Draw the two bodies
    x1,y1,z1 = body1.getPosition()
    x2,y2,z2 = body2.getPosition()
    pygame.draw.circle(srf, (55,0,200), coord(x1,y1), 20, 0)
    pygame.draw.line(srf, (55,0,200), coord(0,2), coord(x1,y1), 2)
    pygame.draw.circle(srf, (55,0,200), coord(x2,y2), 20, 0)
    pygame.draw.line(srf, (55,0,200), coord(x1,y1), coord(x2,y2), 2)

    pygame.display.flip()

    # Next simulation step
    world.step(dt)

    # Try to keep the specified framerate
    clk.tick(fps)
Explanation
import pygame
from pygame.locals import *
import ode
In this example we'll start creating an output that's visually a bit more appealing than the output of the first tutorial. We'll use the pygame package to open a window which we'll use to display a 2D animation of the simulated bodies. So here we import the necessary pygame stuff and, of course, we also import ode.
def coord(x,y):
    "Convert world coordinates to pixel coordinates."
    return 320+170*x, 400-170*y
This function will be used to convert world coordinates into pixel coordinates used for displaying.
# Initialize pygame
pygame.init()

# Open a display
srf = pygame.display.set_mode((640,480))
Well, there's not much more to say here, we just initialize the pygame package and open a window with a display area of 640x480 pixels.
# Create a world object
world = ode.World()
world.setGravity((0,-9.81,0))
Now here starts the ODE stuff. Just as in the first tutorial we'll start by creating a world object where we can put the bodies and joints in.
# Create two bodies
body1 = ode.Body(world)
M = ode.Mass()
M.setSphere(2500, 0.05)
body1.setMass(M)
body1.setPosition((1,2,0))

body2 = ode.Body(world)
M = ode.Mass()
M.setSphere(2500, 0.05)
body2.setMass(M)
body2.setPosition((2,2,0))
Next we create two bodies and place them at position (1,2,0) and (2,2,0).
Note: It's important to place the bodies at their desired position before connecting them with joints!
# Connect body1 with the static environment
j1 = ode.BallJoint(world)
j1.attach(body1, ode.environment)
j1.setAnchor( (0,2,0) )
Here we create a ball joint and connect body1 with the static environment. The joint is placed at position (0,2,0). So far body1 already forms a pendulum.
# Connect body2 with body1
j2 = ode.BallJoint(world)
j2.attach(body1, body2)
j2.setAnchor( (1,2,0) )
We create another ball joint and connect body2 with body1. The joint is placed at the same position than body1. So this means we have another pendulum which we attach to the first pendulum.
# Simulation loop...

fps = 50
dt = 1.0/fps
...
Here you can set the desired frame rate (fps) which also
determines the simulation time step (dt).
The remainder of the program is actually nothing new, there's just a bit more code since we have to deal with a graphics window where we draw the bodies and which receives user events.
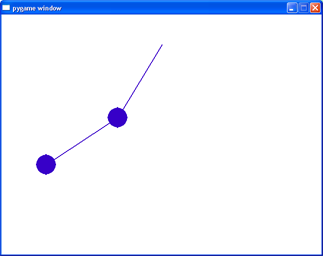
If you run the program you see a swinging double pendulum.
Using Motors
Now we modify the program and make the first joint a motor driven
joint. To do so, we have to replace the ball joint with another joint
since ball joints don't support motors. We'll use a hinge joint instead.
So please replace the definition of the first joint j1 with
the following lines:
j1 = ode.HingeJoint(world)
j1.attach(body1, ode.environment)
j1.setAnchor( (0,2,0) )
j1.setAxis( (0,0,1) )
The first three lines are almost identical to the previous version, we just used a HingeJoint instead of a BallJoint. The last line sets the Z axis as rotation axis (by default the X axis is used). The Z axis is the one that's perpendicular to your monitor screen. If you run the program now, you won't notice a big difference since we're in 2D anyway. But now add these lines:
j1.setParam(ode.ParamVel, 3)
j1.setParam(ode.ParamFMax, 22)
The first line sets the angular speed that the motor should maintain and the second is the maximum force the motor allowed to apply. Now run the program and you'll see the joint is driven by a motor, a rather weak one in this case since it has difficulties to maintain the velocity. Please try different values for the velocity and maximum force and see what happens.
So you've seen, all you have to do to switch on a motor is to set the maximum force to something else than zero, then it will try to maintain the currently set velocity value. The motor is switched off again by setting FMax back to zero.